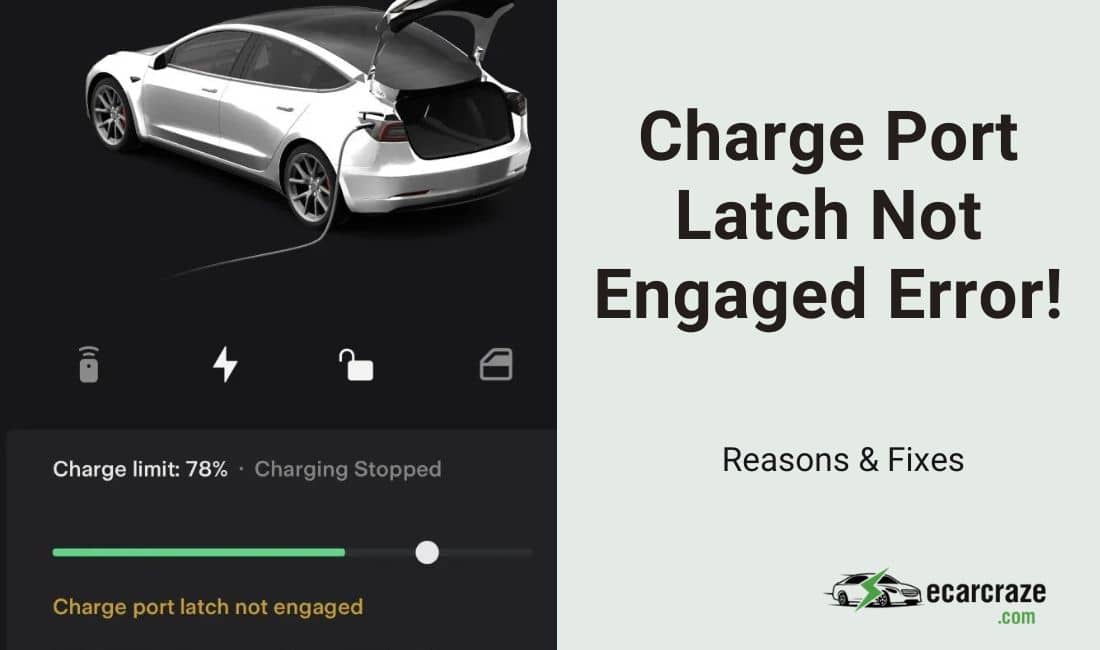
Once the charger is properly plugged into the Tesla and the vehicle starts charging, the light on the little Tesla logo should be green. Sometimes, the light remains white or blue, and you get an error message for the charge port latch not engaging.
So, why does the Tesla “Charge port latch not engaged” error message appear? It indicates the charger isn’t properly plugged into the charge inlet. This can happen due to clogged charge ports, damaged latches, ice on the latch, or a software glitch. There can be other reasons as well.
Know all the reasons for this problem and learn how to fix them in one single guide. Let’s get started.
Tesla ‘Charge Port Latch Not Engaged’ Error Message: What Are the Reasons?
The charge port latch on your Tesla may not engage for various reasons. I compiled them below and provided detailed solutions to them.
1. Dirt or Debris In the Charge Port
While charging your Tesla, the charge port cover remains open. Foreign particles, such as dirt or debris, can enter the charge port and clog it. Next time when you try to insert the charger, the charge port latch will not engage, and you will get the error message.
Debris on the charger can also cause this problem. Whether you are looking at the main screen or the mobile app, the same error message will appear.
Symptoms
- There will be no click sound of the charger latching into the port.
- The charging indicator will be white, which means the charger isn’t inserted properly and the latch is unlocked.
How to Fix It?
- You should inspect the charge port visually for signs of dirt or debris. Clean the charge port with a soft-bristle brush to remove any restrictions from the latch.
- Also, clean the charging connector to make sure there is no dirt or debris on it. Compressed air is also helpful in cleaning charge ports or connectors. But don’t use a damp cloth to clean these components.
2. There Is Ice On the Charge Port Latch
Parking your Tesla in a cold climate area can cause snow or ice to accumulate on the charge port latch, especially in winter. When you try to connect the charger, the latch won’t engage, and the vehicle won’t charge. It is a common issue for Tesla owners living in extremely cold environments.
Symptoms
- While pushing the charging connector, you may get a squishy feel. The charger won’t go all the way into the port.
- The white indicator will be turned on.
How to Fix It?
- You should use a hot air blower to remove the ice or snow from the charge port. Select a low setting so that you don’t damage anything. And don’t use any sharp objects to remove the ice.
- Slowly blow hot air into the icy area of the charge port and let the ice melt away. Once the ice is clean, you should wipe the area with a clean cloth. Then, try connecting the charger again, and it should get latched with a click.
- In some vehicles, you may get a charge inlet heater. If your vehicle has this feature, you can use the heater to defrost the ice.
3. Worn or Damaged Latch
Some Tesla owners may be careless enough to pull their charge connectors out forcefully. It can damage the latch, and you will get an error message. Over time, the latch can also face wear and tear.
So, the latch will not engage properly. As a result, the charge connector will not be latched.
Symptoms
- The charger might go all the way into the charge port, but there will be no clicking sound.
- A white LED indicator will be illuminated.
How to Fix It?
- You should inspect the charge connector. The charge pins should have small black tips on them. If the tips are missing, the latch won’t engage properly. In that case, you can get a free replacement if the warranty period isn’t over.
- If regular wear causes the latch not to engage, you should contact your nearest Tesla service center to get the latch replaced.
4. The Software Is Outdated or Glitchy
Sometimes, there might be no mechanical issues with the charge connector or the charge port. Software bugs or outdated software can cause this issue. In this case, there will be no signs of damage or abnormality on the charge port or the connector.
Still, the “Charge port latch not engaged” error message will show up.
Symptoms
- You should see the white LED indicator without any apparent reasons.
- The charger will be in the right position, but the latch won’t click.
How to Fix It?
- The first step is to reset the software. Your Tesla has two scroll buttons on the steering wheel. Press and hold both of them until the screen goes black.
- Then, release the buttons. The software will now reset, and the problem should disappear.
- If you still have the problem, check for software updates. Go to the “Software” tab on your screen and tap on “Check for updates.”
- Download the update and install it. Then, reset the Tesla once again. If there are no other issues, the latch should now engage correctly.
5. The Scheduled Charging Feature Is On
If you use the scheduled charging feature, your Tesla will only accept the charge connector during the specified period. When you insert the charge connector outside that period, the charge port latch won’t engage.
Symptoms
- Even if the charger is connected, the vehicle won’t charge.
- You will notice a blue LED indicator.
How to Fix It?
- Check your charge settings to see if the scheduled charging or departure is on. Go to “Controls” and tap on “Charging.”
- If the “Scheduled Charging” feature is selected and a time is specified, the vehicle won’t charge before that time. Unselect the option and save your settings.
- Also, deselect “Off-Peak Charging” if it is selected.
6. The Charger Is Incompatible
If you don’t have your charge in the vehicle and need to charge the vehicle in a random charging station, this error can occur. Not all charging stations will have charge connectors compatible with your vehicle.
As a result, the charge port latch won’t be engaged, and the vehicle will not charge.
Symptoms
- The charge connector won’t go all the way into the port. Pushing the charge connector may break the pin.
- A white LED indicator will show up.
How to Fix It?
- You should go to a charging station that has Tesla-compatible chargers. For example, the Tesla Supercharger Network will be a good option. CHAdeMo and CCS stations are also fine.
- Try to carry your original charge in the vehicle. It will help you avoid the situation.
How to Prevent Tesla “Charge Port Latch Not Engaged” Error Message?
You should follow the charging instructions from Tesla to prevent any unwanted problems. Here are some factors you need to keep in mind.
- Open the charge port cover. Then, align the charge connector with the port and gently push it inside. The connector should not be pushed forcefully.
- Similarly, don’t pull the connector forcefully when the charging is complete.
- Keep the charge port cover closed at all times unless the vehicle is charging.
- Regularly clean the charge port area to prevent the buildup of dirt or debris.
- If you have the charge inlet heater, use it periodically to get rid of ice.
If you’re facing a low voltage battery issue with your Tesla, explore our in-depth guide on Tesla’s battery voltage alerts. Inside, you’ll find actionable strategies to resolve this concern efficiently.
FAQs
You might have some more questions about the problem in your Tesla. Here are the answers to them.
- Q: What if the Tesla charge port latch isn’t engaged and the light isn’t working?
You should contact your local Tesla service center to get the issue checked. There might be electrical issues in the vehicle.
- Q: Should I keep the charge connector inserted if the latch doesn’t engage?
No. Keeping the connector pushed won’t do anything unless the latch is engaged. You better find the reason for the problem and solve it first.
- Q: Can electrical problems cause the charge port latch not to engage?
Yes. But you might not be able to diagnose the issue. Call for Tesla mobile repair or take the vehicle to the service center.
Conclusion
The charge port latch is a security feature that holds the charger in place and ensures the vehicle is charging smoothly. But sometimes, you see the Tesla charge port latch not engaging an error message on the screen.
This mostly happens due to dirt, debris, or ice in the charge port. Worn or broken latches, outdated or glitchy software, and scheduled charging can also cause the problem. I mentioned all the necessary steps to eliminate the issue. Follow the owner’s manual of your Tesla to charge the vehicle safely.

I am an experienced guide in electric mobility, offering clear and expert guidance for those venturing into the world of electric vehicles.
Through collaborations, research, and hands-on experience, I navigate readers through the evolving landscape of smart automobile technologies and the significance of renewables.